Form submission
Form submission - multiple state slices
State is commonly used when working with forms to get user input. Thus far, we have reacted to individual events. With forms, it's common to react to the overall form submission. You can combine the input from multiple input fields and send the data to a backend server on submission of the form.
React provides the onSubmit prop that can be added to <form> elements to assign a function that should be executed once a form is submitted. In order to handle the submission with React, you must ensure that the browser won't do its default behavior and send an HTTP request. This is achieved by calling preventDefault().
<form onSubmit={handleSubmit} >
Real authentication logic (e.g., API request) would replace the console.log.
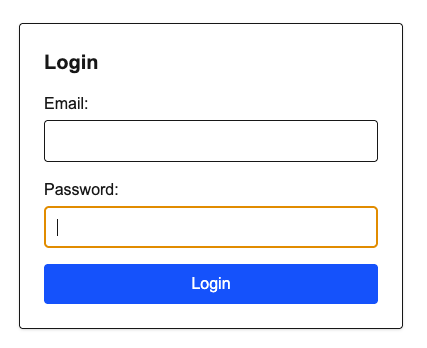
The following LoginPage component renders:
'use client';

import React, { useState, FormEvent, ChangeEvent } from 'react';

type LoginFormData = {
  email: string;
  password: string;
};

export default function LoginPage() {
 const [formData, setFormData] = useState<LoginFormData>({
    email: '',
    password: '',
  });

  const handleChange = (e: ChangeEvent<HTMLInputElement>) => {
    const { name, value } = e.target;
    setFormData((prev) => ({
      ...prev,
      [name]: value,
    }));
  };

  const handleSubmit = (e: FormEvent) => {
    e.preventDefault();
    console.log('Submitted:', formData);
  };

  return (
    <div className="max-w-sm mx-auto mt-10 p-6 border rounded shadow">
      <h2 className="text-xl font-semibold mb-4">Login</h2>
      <form id="loginForm" onSubmit={handleSubmit} className="space-y-4">
        <div>
          <label htmlFor="email" className="block font-medium mb-1">
            Email:
          </label>
          <input
            type="email"
            id="email"
            name="email"
            required
            value={formData.email}
            onChange={handleChange}
            className="w-full px-3 py-2 border rounded"
          />
        </div>

        <div>
          <label htmlFor="password" className="block font-medium mb-1">
            Password:
          </label>
          <input
            type="password"
            id="password"
            name="password"
            required
            value={formData.password}
            onChange={handleChange}
            className="w-full px-3 py-2 border rounded"
          />
        </div>

        <button
          type="submit"
          className="w-full py-2 bg-blue-600 text-white rounded hover:bg-blue-700 transition"
        >
          Login
        </button>
      </form>
    </div>
  );
}
form state data
formData is the state data and setFormData is the state updater function from the useState hook. Initially data is empty. (lines 11-13)
handle input in handleChange
The handleChange function (lines 16-22):
handleChangeis called every time the user types in an<input>field. This allows React state to sync with what the user is typing.(e:ChangeEvent<HTMLInputElement>)informs TypeScript that the event is from an HTML<input>element. This makese.target.nameande.target.valuevalid.const {name, value } = e.targetextracts the name and value from the input that triggered the event.- If the email input changes,
name = "email"andvalue = "user@example.com" - If the password input changes,
name = "password"
- If the email input changes,
- Updates only the field in state previous state with the newly entered value while keeping
other fields unchanged. Uses the previous state method which passes a function to the updater,
setFormData.
 setFormData((prev) => ({
      ...prev,
      [name]: value,
    }));
previs the previous state (old form data)...prevcopies existing values like password/email. This syntax uses the spread operator to copy the current state.[name]: valueupdates only the changed field. This method avoids overwriting the whole object when only one input changes.
[name]: value is useful when a form has multiple inputs. In this example, we have two:
<input name="email" ... />
<input name="password" ... />
Both use the same handleChange function. When input is entered in the email input,
name = "email" and when input is entered in the password input, name = "password".
So [name]: value becomes the current input. This method allows one function to update
multiple inputs!
sequence example
Here's one example, starting with:
{ email: '', password: '' }
Suppose a user enters alice@uga.edu into the email field:
- e.target.name === "email"
- e.target.value === "alice@uga.edu"
setFormData updates formData to:
{ email: 'alice@uga.edu', password: '' }
There are multiple ways to handle the form input. This method works well because it's:
-
Scalable: works with any number of form fields.
-
Avoids overwriting the entire object accidentally.
-
Keeps form inputs in sync with component state (controlled components).
Lifting state
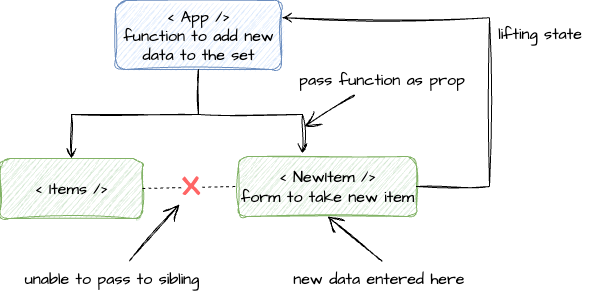
A common scenario in React: two components in the same React app and a change or event in one component should change the state in another component. How do we share the state between components when props can only be passed down.
Consider an example that moves the handling of the button click event up a level, allowing us to share the count among multiple buttons. Moving the state a level so that the state can be shared is know as “lifting state up.”
Sharing data between components
- Array of data is declared as a state variable. Initial set of data may be fetched from a database or read from a file, etc. This becomes the initial state.
- Define a handler function to accept a new data item as a parameter and add the new item to the set of items using the update function returned by
useState. - Pass the handler function as a prop to the new item (form) component.
- On submit of the new data item, call the handler to add it to the set.