The Document Object Model
A key object in client-side JavaScript is the Document object. The document object represents the HTML document displayed in a browser. The API for manipulating HTML documents is known as the Document Object Model - aka the DOM. The DOM API mirrors the tree structure of an HTML document. For each HTML tag in the document, there is a corresponding element object. For each text element in the document, there is a corresponding Text object.
HTML documents contain HTML elements nested within each other, forming a tree.
Using the DOM, we can:
- change/modify
- add elements
- remove elements
- edit elements
- move elements
document
In the Document Object Model (DOM) tree, the document object represents the entire HTML document and acts as the root of the tree. The <html> element is the only child element of the document node. All elements of an HTML document are nodes:
- element -> (html) element nodes
- text -> text nodes
- attributes -> attribute nodes
In the HTML document below, <html> is a parent node; <head> and <body> are children of <html>. <head> is the parent of the <title> node. <h1> and <p> are children of the <body> node.
<html>
  <head>
    <title> Understanding the DOM </title>
  </head>
  <body>
    <h1> DOM Tree and Nodes </h1>
    <p>Hello DOM!</p>
  </body>
</html>
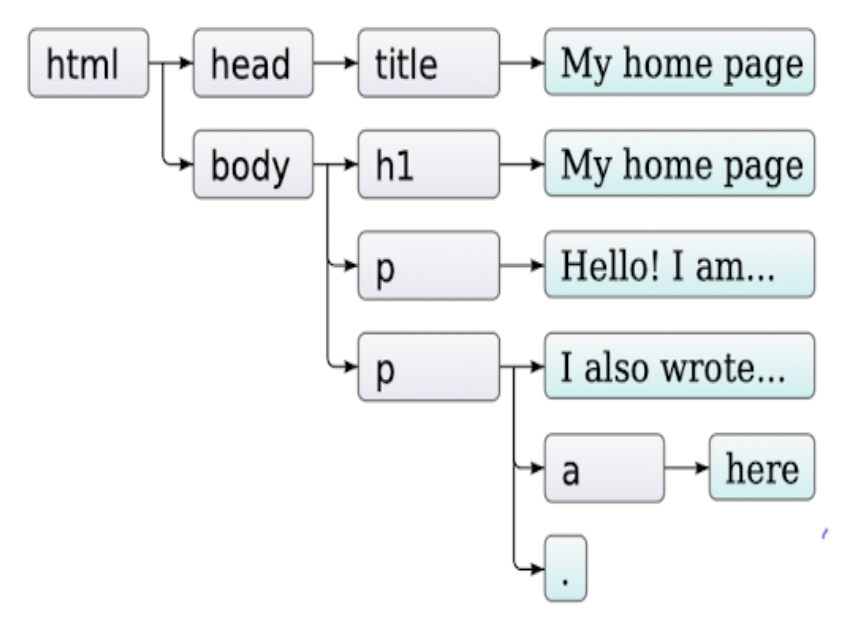
The document object represents the entire HTML document and acts as the root of the DOM.
html- parent element nodebodyandhead- siblings, children of the html nodetitle- element node- child of head
- parent to text node “My home page”
h1andpelement nodes- children of body
- parents of
- text nodes: “hello!”, “I also..”
aelement
node relationships
All nodes in a document are associated with a node type. See the list of available node types on MDN.
Nodes have the following relationships:
- Root node: This is the topmost node
- Parent node: This is any node in the tree that has a node below it, all nodes except the root have a parent node.
- Child node: Any node with one node above it.
- Sibling nodes: All nodes sharing a parent node.
- Leaf node: This is a node that has no children.
- Grandchildren: These are the child nodes of a child.
traversing the document
Everything in an HTML document is a node.
- The text inside HTML elements are text nodes.
- Access nodes in the tree using the parent, child, sibling relationships
- New nodes can be created
- All nodes can be modified or deleted.
Consider the following html:
<div id="parent">
        <div id="firstchild">i am a first child</div>
        <p id="secondchild">i am the second child</p>
        <h4>i am alive</h4>
        <h1>hello world</h1>
        <p>i am the last child</p>
</div>
and this JavaScript:
const parent = document.getElementById('parent').lastElementChild
console.log(parent)

const parent2 = document.getElementById('parent').children[3]
console.log(parent2)
console.log(secondchild.nextElementSibling)
console.log(secondchild.previousElementSibling)
would log this output to the console:
selecting Elements
How do we target elements on our html page from our JavaScript?
JavaScript selectors are methods used to access HTML elements of a web page. Selectors allow developers to target specific elements by tag name, id, types or attributes to manipulate their content, style, or behavior.
Here are the primary JavaScript selectors for interacting with the HTML page:
-
document.getElementById()- selects a single element by its unique id attribute. This method returns the specific element found. -
getElementsByClassName()- returns an array of all elements in the document with the specified class name. -
getElementsByTagName()- returns all the elements of the specified tag name in the order which they appear in the document. -
querySelector()- returns the first value that matches the selector it’s given. This method can accept all CSS style selectors, allowing it to select by tag, class, or ID. -
querySelectorAll()- returns a node list array of all matching elements.
getElementById() and getElementsByClassName() example
For example, this HTML page contains three elements with class="master2".
<p class="master2">i love javascript</p>
<p class="master2">i love react</p>
<h1 class="master2">i want a job</h1>

<button id="btn">click me</button>
In the JavaScript of this html page (below), we select the button with the id btn. If you click the button it selects all the elements with class name master2 and changes the innerHTML (content) of the 3rd element.
const btn = document.getElementById('btn')
btn.addEventListener('click', function switch(){
    var master = document.getElementsByClassName("master2");
    master[2].innerHTML = 'i need a job';
})
Before click:
After click:
getElementsByTagName() example
This example contains multiple paragraphs, <p>.
<p>VsCode</p>
<p>Atom</p>
<p>Sublime text</p>
<button id="btn">click me</button>
We select elements with the <p> tag, put them in master and change the content of the second paragraph element:
const btn = document.getElementById('btn')
btn.addEventListener('click', function switch(){
    let master = document.getElementsByTagName('p');
    master[1].innerHTML = 'Code editors';
})
Before click of the button:
After click:
querySelectorAll()
To find all HTML elements that match a specified CSS selector (id, class names, etc), use the querySelectorAll() method.
querySelectorAll() takes one argument, which is a CSS selector, and returns all elements that match the selector. Given the html below:
<p class="master">React</p>
<p class="master">Vue</p>
<p class="master">Angular</p>
and the attached JavaScript to select all the elements belonging to class master:
const guys = document.querySelectorAll(".master");
guys[1].innerHTML = "Newbie";
Browser view before the button is clicked:
Browser view after click:
querySelector()
querySelector() returns the first match of the selector - tag, class or id. querySelector() takes one argument, a CSS selector, and returns the first element that matches the selector. Consider the html below:
<p>VsCode</p>
<p id="this_one">Atom</p>
<p>Sublime text</p>

<button id="btn">click me</button>
and the attached JavaScript which selects the button by it's id:
const but = document.querySelector('#btn')
but.addEventListener('click', function master(){
    document.querySelector('#this_one').innerHTML = 'New text';
})
Browser view before the button is clicked:
Browser view after click:
Create, add, edit and remove elements
We also have DOM methods to create, add, edit and remove elements. Consider we have the html below:
    <div id="parentDiv">
        <h1>hello world</h1>
        <p>I am the body of text that is statically on this page.  Hope
            you enjoy!
        </p>
    </div>
createElement()
We want to add another div tag from our JavaScript. To create new elements, we have the createElement() method. If our browser executes the JavaScript below:
const newDiv = document.createElement('div');
console.log(newDiv);
We can check the console and see:
innerHTML and textContent
We have created an empty set of <div></div> tags. We can use the innerHTML() property to add its text node.
const innerhtml = newDiv.innerHTML = 'i am a frontend developer';
console.log(newDiv);
and in a check of the console we see:
We can also add text content with the textContent property. In the example below, we create a new paragraph element with createElement and add text to the paragraph by setting the new node's textContent property:
const newPara = document.createElement(‘p’);
newPara.textContent = ‘I am having fun’;
We can add text content with the innerHTML property or the textContent property. The difference is:
- innerHTML refers to the HTML content including tags, attributes and text of the html element as a string
- textContent refers to the plain text content of the element, ignoring any HTML tags within the content and treating them as literal text.
appendChild()
We don't see the new content in our browser window yet. Why?
Because we haven't attached our new elements to the DOM tree yet. We can append elements to the HTML page with appendChild(). In the JavaScript below will add the newly created elements as children of our outermost <div>. This <div> has id="parentDiv".
const parentEl = document.getElementById('parentDiv');
parentEl.appendChild(newDiv);
parentEl.appendChild(newPara);
and now we see the new elements on the page as children of the parent <div>. Here is the HTML and JavaScript:
     <div id="parentDiv">
        <h1>hello world</h1>
        <p>I am the body of text that is statically on this page.  Hope you enjoy!
        </p>
    </div>
    <script>
        const newDiv = document.createElement('div');
        newDiv.innerHTML = 'I am a frontend developer';
        const newPara = document.createElement('p');
        newPara.textContent = 'I am having fun';
        // attach new elements to the DOM tree
        const parentEl = document.getElementById('parentDiv');
        parentEl.appendChild(newDiv);
        parentEl.appendChild(newPara);

    </script>
This renders in the browser:
Adding CSS
You can also change the CSS in JavaScript. One popular way is with classes. The DOM API contains methods to:
- add a class
- remove a class
- toggle between classes
classList property
The classList property in JavaScript returns an array of an element's CSS classes, allowing you to dynamically add, remove, toggle, or check for classes using its classList methods like add(), remove(), and toggle().
add()
To change CSS in JavaScript by adding a class, use the add() method of the classList property to add a new class to the element.
parentEl.classList.add('myCardClass');
Your css must define the style for class myCardClass.
remove()
To change the CSS by removing a class, use the remove method of the classList property.
parentEl.classList.remove('myCardClass');
toggle()
The toggle() method of classList, toggles a class on or off. If the class is present, it's removed; if it's absent, it's added. This is very useful for things like expanding or collapsing menus.
parentEl.classList.toggle('highlight');
Your css must define the style for class highlight.
setAttribute()
The setAttribute() method in JavaScript is used to set the value of an attribute on a specified HTML element.
If the attribute does not exist on the element, setAttribute() adds a new attribute with the specified name and value. The syntax follows,
element.setAttribute(attribute, newValue);
where:
- element: The HTML element on which to set the attribute.
- attribute: A string representing the name of the attribute to set (e.g., "id", "class", "src", "href").
- newValue: A string representing the value to assign to the attribute.
Here's an example that sets the class attribute to highlight:
parentEl.setAttribute('class', 'highlight');
Events
Client-side programs are largely event driven; they typically wait for the user to do something. HTML events are signals that something has occurred within the web page or browser environment, enabling JavaScript to react and execute code in response in the DOM api. These events can originate from various sources and are tracked by the browser:
- User Interactions:
- mouse events: click, dblclick, hover,...
- keyboard events: keypress
- form events: submit change, input focus, ...
- Browser State Changes:
- load/unload of content
- media: play, pause , stop
- window events: resize, scroll, ...
- Custom Events: created by developers for custom event handling
Event-driven JavaScript programs register callback functions for certain events and the web browser invokes those functions whenever the events occur. The callback functions are called event handlers or event listeners.
- Event handlers are JavaScript functions.
- When an event occurs on an element, the handler function is executed.
- The addEventListener() method attaches an event handler to a DOM object.
    const button = document.getElementById('myButton');
    button.addEventListener('click', function() {
        alert('Button was clicked!');
    });
In the above example, you’re asking the DOM API to listen for a click event on the button. The browser maintains an internal event table/registry that tracks:
-
Which element the event is bound to.
-
The event type (click, input, keydown, etc.).
-
The callback function to run when it happens.
addEventListener()
You can register an event listener to an element or any DOM object with addEventListener(). addEventListener() accepts three parameters:
- the type of event, like "click"
- the function to be executed. This function is referred to as the event handler.
- optional boolean value specifying whether to use event bubbling or event capturing.
Consider the following html and css:
<style>
body{
    align-items: center;
}
.btn{
     background-color: blueviolet;
     width: 200px;
     border-radius: 5px;
        }
</style>

<button id="mast">Click me</button>
add the following JavaScript to toggle the style of the button:
const btn_el = document.getElementById('mast')
btn_el.addEventListener('click', addFunction)

function addFunction(){
    btn_el.classList.toggle('btn')
}
We see this in the browser before click:
but after the click, the style toggles:

addEventListener() accepts a function - the handler - as the second parameter. This function is executed when the event occurs. The above example uses a function declaration for the handler but you can also
pass an arror function:
btn_el.addEventListener('click', () => btn_el.classList.toggle('btn'));
form submit
The submit event on an html form fires when:
- the user clicks a submit button
- the user presses Enter while editing a field in a form
Use the event name and establish the handler with addEventListener():
addEventListener("submit", (event) => {});
Consider a simple html form:
  <form id="myForm">
    <label for="name">Enter your name:</label>
    <input type="text" id="name" name="name">
    <button type="submit">Submit</button>
  </form>

  <p id="output"></p>
When the form is submitted, you can access the input entered via the .value property:
  <script>
    const form = document.getElementById("myForm");
    const input = document.getElementById("name");
    const output = document.getElementById("output");

    form.addEventListener("submit", (event) => {
      event.preventDefault();
      const nameValue = input.value;
      output.textContent = "You entered: " + nameValue;
    });
  </script>
In the above example, we get references to the form elements each labeled with an id. Then, we attached a listener to listen for the submit of the form. preventDefault() is important because it prevents the browser from automatically reloading the page. Then we get the input from the .value property of the input element and display it on the page in the paragraph tags. event (often written as e) is the event that is passed to the event handler (onSubmit, onClick) when the event occurs.
onSubmit or onClick
addEventListener() is the preferable method for handling form submission in applications where multiple event listeners or event removal may be required. You can also add inline event handlers with attributes such as onclick or onsubmit.
In React, event handling is typically done by adding inline event handlers directly to html (JSX) elements. When building React components we'll use properties like onClick or onSubmit, rather than using addEventListener().